Saturday, June 2, 2012

Favourite Podcasts

This is definitely off topic, but I'd like to share with you some of my favourite TED Talks and other podcasts

On Education 
http://www.ted.com/talks/lang/en/ken_robinson_changing_education_paradigms.html
http://www.econtalk.org/archives/2013/12/doug_lemov_on_t.html

Power of Introverts 

On the Singularity
 http://podcast.cbc.ca/mp3/ideas_20080505_5562.mp3

Munk Debate on the Economy
http://podcast.cbc.ca/mp3/podcasts/ideas_20111121_94389.mp3

Pet Rapture Insurance
http://podcast.cbc.ca/mp3/wiretap_20090919_20416.mp3

Creativity and Imaginationhttp://www.econtalk.org/archives/2012/06/jonah_lehrer_on.html

Startups innovation and creativity
http://www.econtalk.org/archives/2009/08/graham_on_start.html

George Orwell
http://www.econtalk.org/archives/2009/08/hitchens_on_orw.html

Adam Smith
http://www.econtalk.org/archives/2011/06/otteson_on_adam.html
http://www.econtalk.org/archives/2010/11/phillipson_on_a.html

Anticommons (A new and somewhat undeveloped idea. But still interesting)
http://www.econtalk.org/archives/2009/11/heller_on_gridl.html

StoryTelling
http://www.econtalk.org/archives/2011/10/frank_rose_on_s.html
http://www.npr.org/2013/05/23/186301332/framing-the-story?showDate=2014-04-11

"Podcast Extra: Extended Cut of Andrew Stanton" - originally from NPR
http://podcastdownload.npr.org/anon.npr-podcasts/podcast/510298/191512150/npr_191512150.mp3


Parenting
http://www.econtalk.org/archives/2012/09/paul_tough_on_h.html
http://www.econtalk.org/archives/2012/05/owen_on_parenti.html

From Under the Influence is a good show
http://www.cbc.ca/undertheinfluence/season-3/2014/04/12/terrys-bookshelf-1/
http://www.cbc.ca/undertheinfluence/season-2/2013/06/15/this-much-i-know/

I'm also a big fan of NPRs TED radio hour
http://www.npr.org/programs/ted-radio-hour/
you'll need to search independent podcast libraries for the older episodes


Others podcasts on Econtalk related to
- Spontaneous order
- Theory of the firm
- Ronald Coase

http://www.econtalk.org/archives/2008/10/shirky_on_coase.html
http://www.econtalk.org/archives/2011/12/klein_on_knowle.html
http://www.econtalk.org/archives/2013/01/boettke_on_livi.html

Tuesday, July 5, 2011

Siding

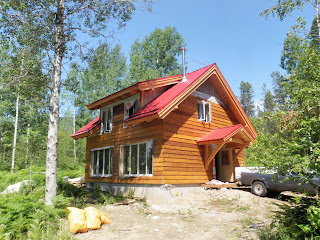
There's very little to say about siding. It's mostly just an excuse to post some photos.
We have managed to put up most of the siding. It took a long time to decide on the siding. The main decision was whether to go with hardiplank or wood siding. The discussion lasted months and was probably the reason we didn't get the siding installed last fall. We finally had to make a decision and here's the basics

Hardi-plank:
Pros: Fire resistant, cheaper than wood (if you buy it on sale at home depot), and comes pre painted
Cons: Heavy, difficult to install and requires re-painting (I believe re-staining is far easier than re-painting)

Wood Siding:
Pros: Light, easy to install and only requires staining
Cons: Flammable

For wood we were determined to use cedar. After a few calls we determined that you can't find cedar siding in the Kootenays, only larch and pine. Luckily we managed to obtain a truck for transporting our fridge, stoves, bath and other wood so we purchased cedar siding in the city and drove it up. Also the cedar siding in the city was slightly cheaper than the larch siding in the interior.


The siding was stained with Cetol SD (colour: Natural Oak 005)  and a big thank you goes out to everyone who helped stain and mount the boards.

We're currently working on the ventilation system and I'm building a system similar to the one described in the book "Energy Conservation in Housing". I'll add a post about this once there is more to share.

Saturday, June 4, 2011

Resources

I'll be posting a building update soon, I promise.
In the mean time here's some of the useful internet resources I've found. There are a lot of websites that describe the ideas of energy conservation and design without any substance. I found these sites give me actual details I can use in the design process.
I'll update this list as new ones come along.

Quality Blogs
Passive House
Musings of an Energy Nerd

Radiant Floor Heating and Pex Pipe

Cross-Linked Polyethylene (PEX) Water Supply Piping
Radiant Floor Heating - Dry System Hydronic
Installing PEX Pipe | OnlineTips.org
Within_Slab_Installation_Radiant_Heat.pdf (application/pdf Object)
Radiant_Heating_Tubing_Layout.pdf (application/pdf Object)
Radiant_Heat_Design_and_Construction.pdf (application/pdf Object)
Radiant heating installation manuals-easy to understand, pictures and diagrams.
Manual_web-2009.pdf (application/pdf Object)
Exergy
LowEx.Net
Thermal Insulation
Passive House Thermal Insulation
Windows
Efficient Windows
Richersons Doors
Windows - Accurate Dorwin

Modelling

Warmair.com - Radiant Floors
Radiant Underfloor Heating Systems. PEX Radiant Floor Heating System. Radiant PEX Tubing. Under Floor Heating.
Infloor Radiant Design Guide | Healthy Heating | A not for profit educational resource site
Radiant Heat From Radiant Floor Company - Building and Code Issues
www.healthyheating.com • View topic - For Seminar Attendees, Students, Delegates & New Guest
The Do's & Don'ts of Hydronic System Design - Feature Articles - PM Engineer
Hydronics houseneeds.com
Taco FloPro
Controlling Water Temps in PEX Radiant Heat Systems. PEX Pipe Radiant Heat and Hydrinc Heating Applications
Publications by Appropriate Designs - The Specialists in Hydronic Comfort Heating - HydronicPros.com
Watts Radiant Onix Tubing Installation Manual
Ventilation
HRV Installation Basics
Complete digital copy of "Energy Conservation in Housing"


Thursday, July 1, 2010

Roof Structure

Here's a few shots of the roofing. You may notice that the eaves are built into the roof. We had a roofer do the metal work to complete them and I'm quite happy with the results. I don't like adding gutters to the outside of a roof. To me it looks like an afterthought and we know we want to capture the rain water and use it as much as possible.
We also chose to go with steel roofing with hidden screws. The steel is 26 gauge, which is stronger than the standard 28 gauge) and with hidden screws it should last a very very long time.


As for the roof structure, since our rafters are exposed to the interior of the house we were able to keep the roof structure simple and layered. Here's the layers.

steel roofing
1x4 strapping
1/2" plywood
2x8" box containing 2x 3.3" of the iso-board foam (same stuff as the walls)
6-mil vapor barrier
tongue & grove pine
rafters

Sunday, June 27, 2010

Radiant Floor Heating

The ground floor is a 5.5" concrete slab on top of 3" of sand, all insulated with R25 foam to provide a large thermal mass.

We installed 750' of 1/2" pex piping into the floor for radiant floor heating and to help manage the heat flow into and out of the thermal mass. The 750' was split into 3 x 250' lengths which all run parallel.

As part of the pipe layout I did a number of calculations to determine the spacing of the tubes. Essentially I did the calculations according to the CSA standard to determine how much heat the flooring would need to provide (assuming it provides 70% of the heat for the house when it -20 C outside) and from there I calculated the total tube length spacing, as well as geeky things like the Reynolds number (to ensure the flow in the tubes is turbulent).

There is only one zone. This keeps the number of bends to a minimum and keeps the flow control simple. If you have multiple zones then you need to throttle down the flow in the shorter pipes to ensure you have even heating throughout the house. There is an art to throttling down the flow rate, requiring a good controller that costs a lot more than what I need for this simple system. Throttling down the flow rate is also inefficient due to head losses in the valves.

There is a lot of suggestion that radiant floor heating is a waste of money for a superinsulated house such as this. A big incentive to use radiant floor heating is to have nice warm floors underfoot, but for this house the floor temperature will be only slight higher than the room temperature and it will not feel warm.

My argument is that I can use the water in the pipes to remove heat during the summer. To keep the house cool we'll pump some of the irrigation water through the floor before the water goes outside to water the garden. In the fall and spring it's more efficient to warm a lot of water a few degrees above room temperature, than run baseboard heaters. But to back up this claim I really need to do an analysis of the exergy (thermodynamics) of heating the house. Basically an exergy analysis tells us that it costs less to heat 2L of water by 15 degree than it costs to heat 1L of water by 30 degrees, even though the same amount of energy is being transferred to the water.
Additionally the cost of the pipe is minimal. Most of the cost of radiant floor heating is the boiler and controller. When the outside temperature drops below ~-0C we plan to use the wood stove, so we only need a boiler large enough to supply the heated water during the shoulder months and to help the wood stove during the winter. This reduces the cost of the boiler (by how much I have yet to determine).


We also poured the concrete at the start of July.

Thursday, May 27, 2010

Floor insulation

We will have radiant floor heating for at least the ground floor and I hope to eventually have it for the second floor too. I'm just working through the calculations for the radiant floor spacing and they are going well.

I prepped the floor with two layers of R 12.5 rigid foam insulation. I'm not sure specifically what type as I just went to the building center and asked for insulation I could lay below a concrete slab. It has a picture of Pink Pather on it ;-)

I also put a layer of 6 mil plastic between the two layers of foam. Most designs seem to lay the plastic on top of the gravel, then one layer of foam. I figure that would perforate the plastic and I knew I would have two layers.


On top of the 2nd layer of foam I put 3 inches of sand, compacted it and it awaits the concrete slab.

Electrical Cable

Wow, two posts in one day.

Last weekend (yes the May long weekend) I had the electrician and the excavator working to install the underground cable. The electrician wanted to work on the weekend and it was good to do the work when the framing crew weren't around.

We installed the power pole 30 m from the road. The remaining 70 m was an underground cable.


Since the distance between the pole and the cabin is more than 200 ft we had to upsize the cable by two gauges. Here's the 70 m coil.


We had to dig a big trench (yes, that was the driveway) then I prepped the trench with sand for the cable and a pvc pipe for Telus/Shaw cables. We laid the cable and tubes then had to cover them by hand before we could refill the trench with the excavator.

It was a long day but the trench was filled and the pole was up (and straight) after 8.5 hrs. The excavator returned the next day for two hours of clean-up and to re-smooth the driveway.

Photo update

I'll post more design details when I have time, but for now I have photos. In mid April we started the foundation. Full on construction began in the first week of May and we are now about a week from lock-up.

The windows went in today so it's a good point in which to post photos.


Here's a nice one (taken before the roof was completed) of the interior timber frame.

Thursday, April 1, 2010

Wall Insullation

Combined with the decision on the type of structure, we needed an idea of how to insulate the walls. Conventional insulation would assume 6" walls with 'pink' fiberglass insulation in between. This provides too little insulation and too much thermal bridging. A netzero house in Edmonton is using a nice double wall design that utilizes two 2x4 walls with a 6" gap in between. We also looked into blow-in cellulose, straw bale (but the climate is too wet), structured insulated pannel (SIP) walls (our walls aren't structural), and put a lot of thought into where the air/vapour barier should be located in the entire system (most people but the air barrier on the inside of the stud wall, a big mistake in my opinion as this makes the house much more difficult to seal). We really liked what the energy nerd had to say about external insulation techniques and we've decided to go with the REMOTE technique with two layers of 3" rigid insulation on the outside of the studs and air barrier. The same goes for the ceiling and should make it a lot easier to seal the envelope.

Once the technique was determined we sourced out the insulation. Purcell Timber Frame orders R22, 3.3" thick isoboard for their roof structure (I hope to post a blog on roof structures). We decided to get them to order some extra for the walls too. I first got confused with R values but I have learned (thanks to wikipedia) that there is the R value (ft²·°F·h/Btu Imperial Units) and the RSI value (m²·K/W - SI Units). The commercially available insulation uses the imperial units but the Canadian CSA standards use the SI units.

Here's some photos of the final result.


As a side note, I have to poke fun of the BC Hydro power smart team, who recently set up a mini power-smart demo 'house' as part of the 2010 Olympics. Going inside you got to see some fancy energy saving electronics and a washing machine and radiant heaters (which I believe are bogus), but when you asked them 'what is the insulation?' they naivly proclaim that the walls are R12 and the roof is R20. For an energy efficient design that is ridiculously low. I think it's even lower than the Vancouver building standard... I've looked into this a bit more and it turns out the 'Power smart' group don't know much about insulation or energy efficient construction, just electronics.

Room and water heating

What should we do for heating?

Reading through the littany of heating advice for well insulated homes, many people advise against radiant in-floor heating. However this is what we're planning with our slab-on-grade ground floor. I want to make the most of the thermal mass in the slab and hopefully heat it with solar heated water. We'll have a wood stove for back-up and possibly a base board heaters in the upstairs rooms and the washrooms.

In principle it would be nice to have the in-floor heating (the water type) on the second floor as it could absorb heat during the summer day and then at nigh we flush out the pipes with cool water and send the warm water to the garden. This is only theory though.

Then thinking about solar water, should we have three water lines in the house? In the winter there would be cold, warm (solar) and hot (small electric tank). Then in the summer we would turn off the tank and the solar water would be much hotter. If this could work then we would use the winter solar water to also warm the ground floor.... just a thought.

While I'm on the topic, I don't like to waste water while I wait for it to heat up coming out of the tap. One solution I've seem is to have it slowly recirculate by going back into the cold stream and back to the water heater. Of course then you lose efficiency by mixing the hot and cold. So I'm considering installing the hot water as one large loop throughout the cabin. Recirculating back to the heater/solar heater independent of the cold water stream.

Sub contractors

As is typical in the Kootenays, there are lots of people who know an electrician, a roofer, a foundation guy, or an excavator. We took down as many names and phone numbers as we could and I'm enjoying the handling the logistics and timing of the contractors.

Hart and the post and beam team will be ready to start in the first week of May. This means we need the site cleared, excavated and foundations set by then. We found a great young guy named Chris in pass creek to do the excavation, another Chris is doing the form work and is in charge of the foundations. We've also been talking to a Joe about electrical hook-up, we have an account set up with Fortis (the electricity company), and are talking to Brent from Tri-City pumps about installing the well pump.

I would like to thank Younes (my UBC supervisor) for lending us his generator until we get the power hooked up. We're having issues figuring out the electrical hookup because of the distance between the road and the cabin, and the generator is able to provide the contractors with what they need.

Building permit

Next up we had to get a building permit (which was just approved on Tuesday) from the regional district of the central Kootenay. This makes me wonder...if we're central then where is the west kootenay?

According to BC Law we are considered an "Owner Builder", which means we are the general contractor. By doing this we have less fees to pay (directly or indirectly), I do the overall project managing and I get to be more in touch with the details .

We had to navigate the BC bureaucracy. In order to let me build my own home I need authorization from the BC Homeowner Protection Office. I'm still not sure what benefit I get, but I had to pay $450 to get it.

To get the permit Hart (our designer) had to send the drawings to a structural engineer for approval. Hart recommended Cascade Engineering out of Canmore and thus Cascade made some minor changes, but overall the posts and beams remained the same. This cost $1700.

As a side note: In BC (or at least in the Kootenays, but I'm pretty sure it's for all of BC) you don't have to get a structural engineering approval if you're building a conventional timber frame, as all the details are laid out in the BC building code. However we are building a post and beam house, so we needed the engineer's signature.

The permit took three weeks and costed another $1000. So just over $3000 for the government bureaucracy on a 1200 sq-ft cabin.

Windows and doors

Once we got Hart (out designer from Purcell Timber Frames) off and running with the design, we had to decide on windows. Hart recommended a great local company (Boardwalk Windows) to build the windows for us. Unfortunately they only do double-pane wood windows. And after doing a lot of research on windows I became determined to go with triple pane fiberglass windows. This is basically the standard for passive houses.

The cabin has a large bank of windows on the south side, and sparser windows on the other three sides. We got quotes from Boardwalk, Pella, Serious Windows, Thermotec, but in the end we went with Accurate Dorwin. Even though Pella and Serious are American, Thermotec (Canadian) seems to be the main supplier for passive houses in the NE USA. Accurate seem to have an identical product with a much better price point and much better customer service. After the initial quote Thermotec stop responding to me, and Serious was having serious doubts whether they could ship to Canada. Pella are considered top quality in the conventional building industry, but they only off double-pane vinyl windows. I think they have the reputation from a very successful marketing arm and some fancy features.

I can go on about the window research, but I recommend visiting
http://www.efficientwindows.org/
, and the Energy Nerd also has some comments about windows, and German passive-house windows.


As for doors, we want doors with good insulation value. This means a fiberglass insulated door. The choice is much more limited but we are going with Richersons Doors, which can be ordered through most door companies.

Passive Houses

I am keen on trying to meet the passive house building standard, but I'm not willing to hire a consultant. We likely won't succeed but the result will be what commonly known as a 'super insulated house'.

For those who don't know, passive house sets a maximum electricity consumption standard. There are a number of arguable conditions but the overall objective is noble and there are a lot of resources to help achieve this. The main concept is lots of insullation and to have an airtight house, with an active air transfer mechanism. Effectively living in a bubble with a mechanical device that changs the air every 3 hours or so. As the stale air is replaced it exchanges heat with the incomming air to help keep the heat in.

When I first heard this I found it a radically simple concept. I like simple and so I'm on board.

I also picked up a lot of information from some friends and while there are many people bloggin about how important it is to have an efficient house, there are very few people blogging about the details of an efficient house. Details you can use to make decisions. A friend turned me onto Musings of an Energy Nerd, and I am hooked. I highly recommend it.

Site prep

We had to clear the site, install a septic field and build a driveway. We also installed a well then saved up our money for another year before we started to build.

Type of structure

Conclusion first: we decided on a post-and-beam structure because a) it looks nice, and b) it enables us to wrap a more energy efficient wall system around it that reduces thermal bridging. We settled on the Muskoka from Purcell Timber Frames, but we applied our own interior layout.

We also considered an ICF (concrete walls) building, a typical wood frame house, and a hybrid wood frame that is designed to look like a post and beam.

Size and floor design

My partner and I started with the size, shape and layout of the cabin. We both agreed on a small house/large cabin of 1000-1400 sq-ft. We had an idea as to how the cabin was orientated relative to the sun and the driveway. So we looked at hundreds (probably over a thousand) of designs online as well as several books of designs that you can purchase at home depot.

I discussed space issues around vaulted ceilings and basements (both of which we decided against), number of bedrooms (3), number of washrooms (2), and a mud room? (YES!!).
Regarding the overall design I wanted a simple roof line as well as simple plumbing (ie the toilets and kitchen must all be close together), and two stories.

We decided to try and come up with our own floor design. We came up with a rough sketch that we spent several months adjusting before submitting these two drawings to the designer at Purcell Timber Homes (our framing company).


The designer adjusted the dimensions for standard sizes but the overall design is almost exactly what we proposed. I'm a bit of an energy efficiency nut and I'll post about that (and how it influenced our decisions) later.

Sunday, March 28, 2010

Intro to the kootenayhouse

This is my first foray into blogging. I thought it would be a good place for me to show the progress of our cabin and explain some of the decisions we've made along the way...

I'll plan to post topical blogs and I'll update the blogs over time as the construction continues.